Few things in Match Masters hurt more than losing your best booster by just a few points, especially in the middle of a losing streak. It can feel as if your opponent always gets more extra moves than you, while you struggle to fill your booster. Part of it is luck: the starting board and the new pieces are random. But close matches are often decided by small choices, such as when you use your booster or what you leave on the board for your opponent, and getting those right can help you win more often.
Every player who has played Match Masters for a long time has had losing streaks as well as winning streaks. If you keep losing in Match Masters, below you’ll find the problems players run into most, why each one happens and what you can do about it, including how to protect your boosters and trophies while a streak lasts. You don’t need to read everything: start with the problems that sound like yours.
Keep Losing in Match Masters? Quick Fixes
- Opponent keeps getting extra moves: if a 4- or 5-piece match is ready on the board, use it yourself before your turn ends. You get the extra move, the points and a special piece instead of your opponent.
- Opponent goes first and scores big: plan your turn around what they just did. A strong first turn doesn’t decide the match.
- Booster charges too slowly: check the mode’s rules, because blue doesn’t charge your booster in every mode. In normal modes, Star Maker and Mini Cleo help you get more blue pieces on the board.
- Falling behind: keep the score close in the early rounds, and in the last round use every perk you have left.
- Opponent has a stronger booster: the game picks your opponent, and you see them and their booster only on the match start screen. Always bring the strongest booster that suits the mode, and remember that a stronger booster doesn’t guarantee a win.
- Losing boosters fast: buying one of the strongest boosters can help more than playing on with weak ones. When you use the multiplier, stake only as many boosters as you can afford to lose.
- Losing streak: if only weak boosters are left, get a stronger one or take a break. Every loss costs trophies.
- Solo challenge: check the final target before you play. You keep your booster only if you reach it.
- Opponent’s timer looks slower: both players get the same time per turn, and the timer stops during animations.
- Disconnects: you have 30 seconds to reconnect, so play on a stable connection and stay in the game.
Your Opponent Keeps Getting Extra Moves
Watching your opponent get one extra move after another is frustrating. Part of it is luck and part is the booster: new pieces drop in at random and sometimes set up a 4- or 5-piece match for whoever moves next, and a strong booster can create more of these chances. In other matches, the same luck and your own strong booster can give you these extra moves. What you can change is how you use the board:
- Don’t miss a ready 4- or 5-piece match: these don’t come often, so when one is on the board, use it before a normal 3-piece match. It gives you an extra move, points and a special piece. Before your last move, check the board again, because a ready match you leave behind is your opponent’s to take.
- Start with the one at the top: when you see several extra moves, play the one closest to the top of the board first. A match lower down makes the pieces above it fall and can break the others. Keep this in mind after you use the Checkerboard perk, which can leave several extra moves on the board at once.
- Look one move ahead: sometimes a match also leaves a 4- or 5-piece match ready for your next move. It isn’t easy, because new pieces drop in at random, so take it as a bonus when you see it, not as something to count on.
- Use your booster after the extra moves: in most modes, that’s the better order. A booster clears pieces from the board, so using it first can destroy a 4- or 5-piece match that would have given you an extra move.
- Combine special pieces: swapping two special pieces triggers both, even when they’re different colors, and the blue pieces they clear help charge your booster. If two special pieces sit next to each other, use them before your opponent can.
Keep scanning the board during your opponent’s turn as well. Each of their moves changes the board, so you can plan your turn before it starts.
Not every mode shares the board. In Showdown, both players play at the same time, each on their own copy of the same starting board. Match Rumble and Party put you against several players at once, and solo challenges have no opponent at all. In these modes, focus on your own score.
Your Opponent Goes First and Scores Big
It’s easy to feel behind before you’ve made a move. The banner says OPPONENT’S TURN, and sometimes the starting board already has a ready combo for them. But the starting board is random, and next time it can be on your side.
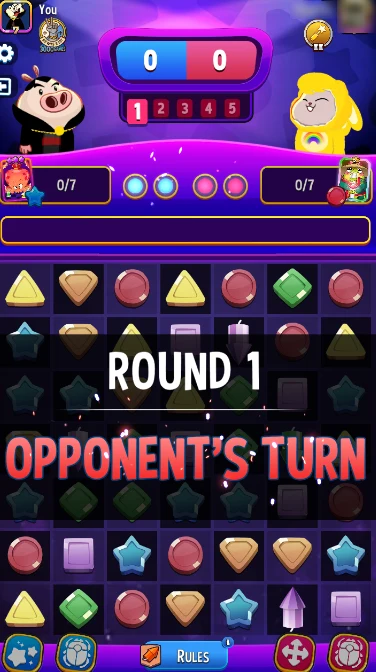
A strong first turn doesn’t decide the match. A normal match has 4 or 5 rounds, and you usually get 2 moves in each one, so your luck can change from one round to the next. If your opponent gets far ahead, use your perks to stay close instead of waiting for a lucky board, and in the next rounds look for moves that build your score without opening chances for them.
Why Going Second Can Help
When you play second, you react to what has already happened, not to what might happen. If your opponent charged their booster fast, you know you need to charge yours fast too. If they couldn’t charge theirs, that’s a big chance: charge yours early, and you can score more in the first round.
Their moves also change the board. Some colors are gone and new pieces drop in, so the board you get can be better than the one they started with. In Gem Grab, every crystal cleared makes the next one that drops in worth more, so you may get the higher-value crystals. A careful opponent won’t leave you easy chances, though, so going second isn’t a free advantage either.
If You Go First, Charge Your Booster Early
When two strong boosters meet, the first rounds matter more. If you play first, try to charge your booster and score from the very first turn. If you miss that chance, your opponent can charge their booster first and take the lead.
Your Booster Charges Too Slowly
Some rounds you barely see a blue piece while your opponent’s booster bar keeps filling. Piece colors are random, and in other rounds the same thing can happen to your opponent. Before you blame the board, though, check the mode: blue doesn’t charge your booster in every mode.
In Energized, for example, two random colors charge it, and they change as soon as one of them is matched. Other modes add extra ways to charge, like the treasure chests in Plunder Pirates. Tap the mode’s tooltip to see the rules before you pick your booster and perks. Our Match Masters game modes guide explains what each mode changes.
When blue pieces really don’t come, these help:
- Go for blue after your extra moves: once you’ve used your extra moves, match blue pieces before other colors.
- Use charging perks at the right moment: Star Maker adds blue pieces to the board, Mini Cleo adds more copies of a piece you pick, and when you activate Energy Boost, the pieces you match right after it charge your booster, whatever their color. Use them when there are few blue pieces on the board, not when there are already plenty.
- Keep one perk for later: each perk works once per match. Try not to use both in the same turn, because a perk can matter more in a later round.
- Keep a charged booster for your next turn: if your time is about to run out, it can be better to keep your booster ready than to rush a weak activation.
With a strong booster, Star Maker and Mini Cleo make a fast-charging pair. Use one early to get ahead on points from the first turn, and keep the other to charge your booster again later. In modes where another color charges your booster, send Mini Cleo to that color instead. You’ll find more pairs in our best booster and perk combinations.
Keep Red Pieces Away From Your Opponent
Your booster charges with blue pieces, and your opponent’s charges with red ones. When their booster bar is almost full, match red pieces to take them off the board. In a normal match, the red pieces you match don’t charge their booster: they simply leave the board, so your opponent can’t use them.
Common mistake in Red Alert: With the Red Alert modifier, matching red pieces charges your opponent’s booster. Red pieces cleared by a special piece explosion count too, so avoid red matches and be careful with special pieces next to red ones.
You Fall Behind and Can’t Catch Up
A big gap often opens in just one or two turns: an extra-move chain or an early booster activation, and your opponent is suddenly far ahead. With only a few moves per turn, a big gap is hard to close in the last round, so the time to react is before it gets that big.
Read the Match Screen Before Every Move
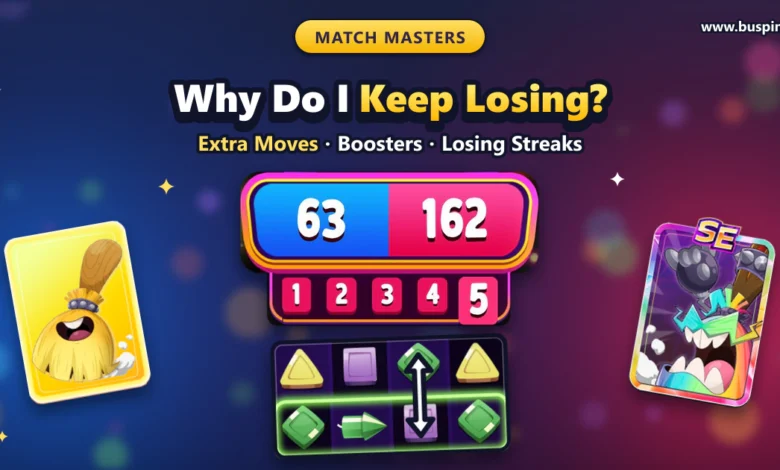
To react in time, you need to know where the match stands, and all of it is on the match screen. Check it before every move, not only at the start of the match. Here is a normal match in its last round:
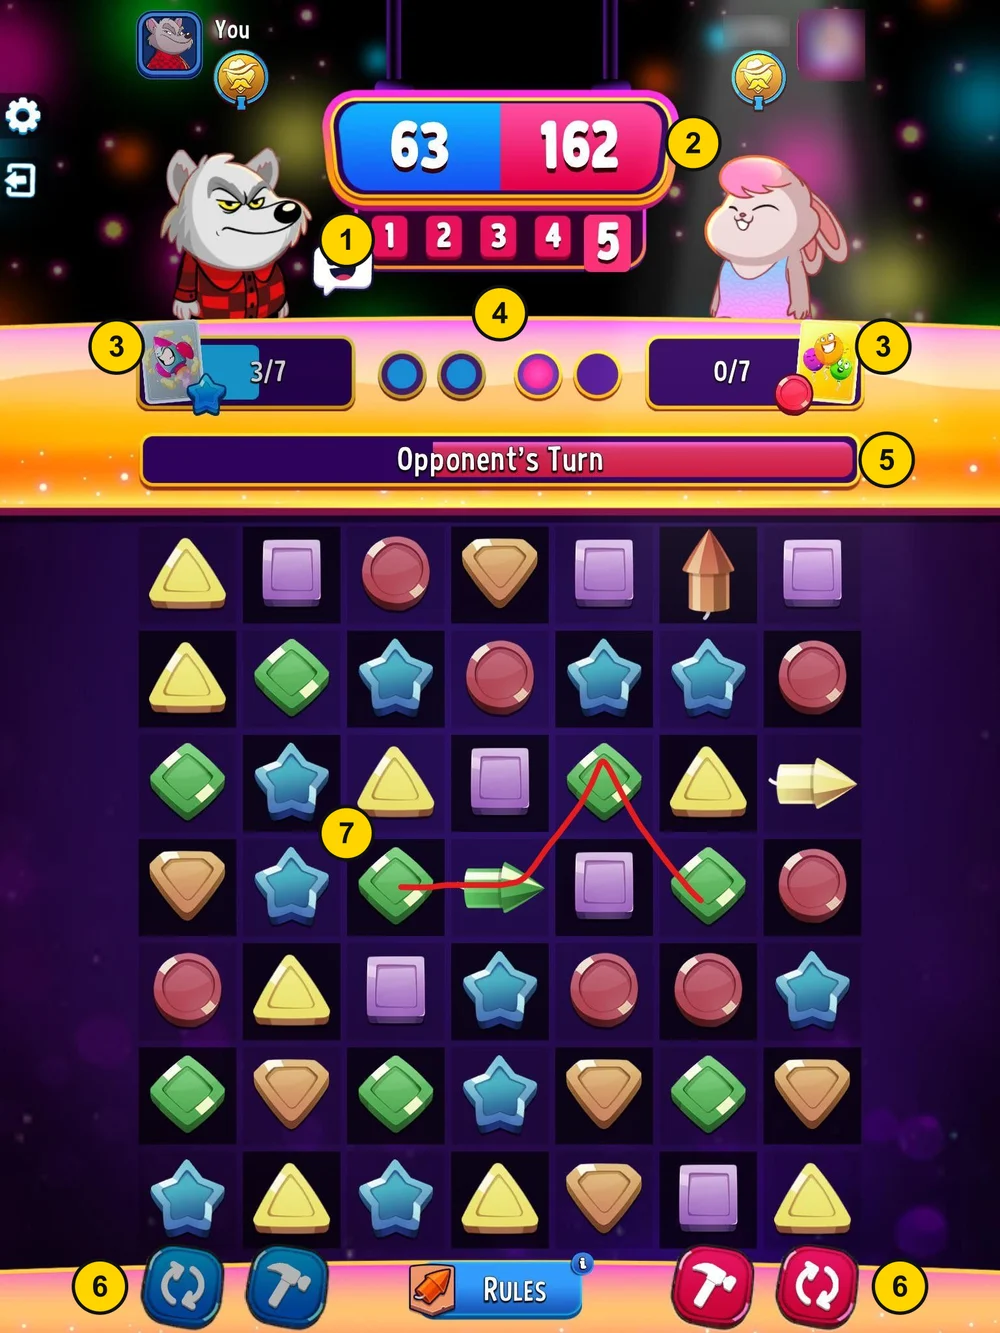
- Rounds: which round you’re in and how many are left. Most matches have 5 rounds, and some modes end after 4.
- Score: yours is on the blue side, your opponent’s on the red side.
- Booster bars: how close each booster is to its next activation. The card next to each bar shows which booster that player brought: here, Crazy Rocket at 3/7 against the opponent’s Balloon Blast at 0/7.
- Moves left: each dot is one move. A normal turn has two, and some modes give three or more. Here, the opponent has used one move and has one left.
- Turn timer: whose turn it is and how much time is left.
- Perks: yours at the bottom left, your opponent’s at the bottom right. Keep track of which perks each side still has.
- A ready combo: the red line marks a 4-piece green match that includes a special arrow piece. It’s the opponent’s turn, so this extra move is theirs to take.
The Last Round: When Is It Too Late?
Look at the screen above again: Round 5, 63 points against 162, and Crazy Rocket at 3/7 against Balloon Blast. Both are weaker boosters, and Crazy Rocket is the weaker of the two.
In your last turn, you have two moves. Even 4 more blue pieces and a booster activation are unlikely to close a gap of almost 100 points. The best try is to use everything that’s left: Shuffle for a chance at a better board, most likely a 3-piece blue match after that, Hammer on one more blue piece or on one of the special arrow pieces, and then the booster. Even that probably won’t be enough.
That’s why the early rounds matter: keep the score close while you still have turns and perks to use. In the last round, there’s no later turn to save a perk for, so use whatever can still help.
Even when a comeback looks unlikely, don’t give up the match. Giving up costs the same trophies and booster as a normal loss, and you get no star instead of one. Our Trophies & Leagues guide shows both result screens side by side.
Your Opponent Has a Stronger Booster
Meeting an SE or Legendary booster while you play a weaker booster feels unfair. Match Masters says its matchmaking takes several factors into account, so you can sometimes be paired with a higher-tier booster. A stronger booster improves the chances, but it doesn’t guarantee a win, and a weaker booster doesn’t mean a sure loss. The mode and how each player uses the board matter too.
You see your opponent and their booster only on the match start screen, after you’ve already picked yours, so what helps most is to always bring the strongest booster that suits the mode. In normal matches, the strongest picks today are the Froggy Fu, Sweep It SE and Jelly SE boosters, the S-tier boosters in our booster tier list. The mode still matters, though: in some modes, even an S-tier booster can lose to an A-tier booster.
At higher levels, your chances against strong opponents are low without a strong booster, and Diamond boosters are rarely enough against SE and Legendary ones. When you have no SE or Legendary booster left, a Diamond booster is still worth a game or two, but if you keep losing, stop and get a stronger booster first. If you have many copies of the same Diamond booster, you can donate some of them to your team.
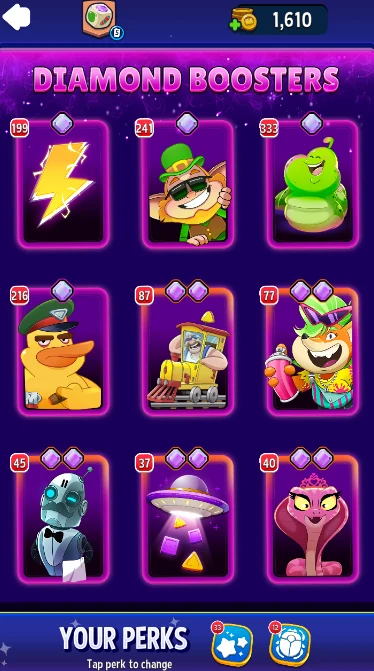
Over the years, Match Masters has added more Legendary boosters, which are unique, and SE boosters, which are upgraded versions of existing boosters. They are among the strongest boosters, and most of them cost about 2,000 to 4,000 coins, more than other boosters, so it can feel as if only paying players have them. Buying items can give some advantages. For example, a random booster or sticker reward can usually be swapped for another one by watching an ad, and the Premium Pass lets you swap it without the ad. But as Match Masters says, buying items doesn’t guarantee a win. You can also get Legendary and SE boosters for free from trophy rewards, events, daily gifts, sticker albums and the Duplicates Bar, and saving some coins to buy them helps too.
If you’d rather play against the same tier, try Booster Clash: it only pairs boosters of the same tier. It runs on Saturdays, needs an Entry Ticket and gives no trophies, and the winner takes the loser’s booster, so bring a booster you can afford to lose.
Why Matches Get Harder as You Climb
As you climb, higher leagues mean tougher competition. Legendary and SE boosters unlock in the Legends League, so from there you meet them more often. It works both ways, though: you won’t always have a strong booster, but neither will your opponent, and when you have a strong booster, your opponent may have a weaker booster.
Your trophies also reset at the end of each season. A new season starts at the same time for everyone, and players collect their Season End Rewards together, which can include SE and Legendary boosters and coins. So in the first days of a new season, you may meet strong boosters more often than usual. Our Match Masters Trophies & Leagues guide explains how leagues, promotion and season rewards work.
Are You Playing Against Bots?
According to Match Masters, you’re mainly matched against real players. In a limited number of cases, when there aren’t enough real players to start a match quickly, the game may pair you with a computer-controlled opponent to reduce waiting time.
You Keep Losing Your Boosters
When you lose a match, Gold and higher boosters are used up, while Bronze and Silver boosters only go on cooldown. That’s why a short losing streak can empty your best boosters so fast. What helps:
- Play your strongest booster: it gives you the best chance to win, and you keep your booster every time you win.
- Not only first place keeps the booster: in Match Rumble, the top 3 players keep their boosters, and in Party, everyone who finishes in the green zone keeps theirs.
- Get one strong booster instead of losing with weak ones: when your best boosters are gone, buying one of the strongest boosters can be a better choice than losing several games with weak ones.
- Stake only what you can afford to lose: at higher levels, the Booster Stakes Multiplier lets you stake several boosters for bigger rewards, but a loss can cost all of them.
- Booster Shield, if you have one: it’s used automatically in your next match and protects your booster once if you lose, so while you have one, play your strongest booster.
Our Match Masters boosters guide explains Booster Shields and the multiplier in detail.
How to Break a Losing Streak
Wins and losses often come in streaks, in both directions. Your opponents are also playing to win, and luck plays a part in every match: when the board is on your side, you can win by a big margin, and when it isn’t, even a good plan may not be enough. What you can control is how much a losing streak costs you:
- Don’t keep going with weak boosters: play your strongest booster, especially in the higher leagues. After a loss, if only weak boosters are left, get a stronger one first, for example from free gifts, or stop playing for a while. Every loss costs trophies.
- Protect your trophies: trophies bring rank prizes and Season End Rewards, and if you drop back, the next rewards get harder to reach.
- Skip the multiplier: don’t stake boosters you can’t afford to lose while the streak lasts.
- Play the board, not only the booster: use ready 4- and 5-piece matches when they appear, and try not to leave your opponent an easy board.
Solo Challenges Feel Impossible
Solo challenges like Perfect Heist and Score Rally can feel impossible after a few failed tries, often because the targets are high. Each event has its own targets and prizes, and the bigger the prizes, the higher the targets can be. Several solos can run at the same time, sometimes even two Perfect Heists, so check the targets of the one you’re about to play.
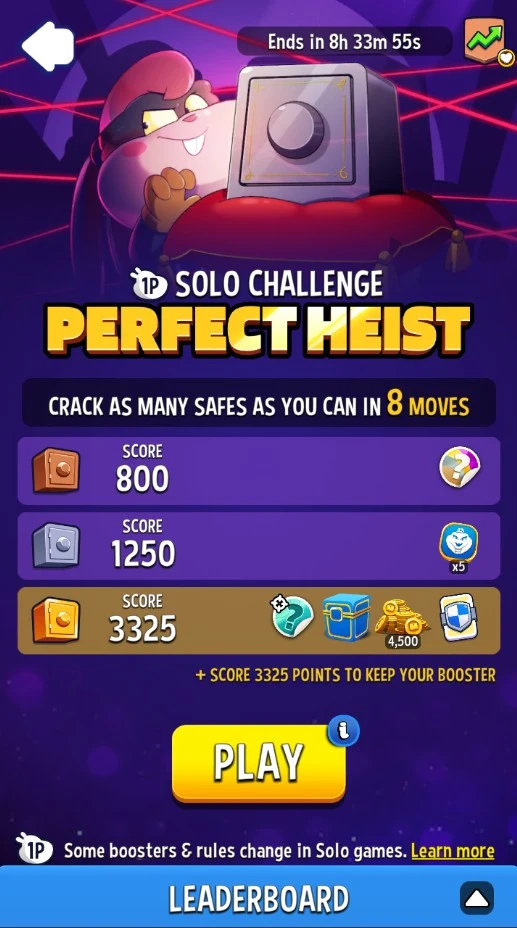
Before you tap PLAY, check the event screen:
- The final target: the line under the prizes that starts with + SCORE shows how many points you need to keep your booster.
- The move limit: it can change from one event to the next, for example 8 or 10 moves in Perfect Heist.
- Your booster: you play the whole game with the booster and perks you pick before it starts, so choose one that can reach the final target, not just the first prize. As the event screen notes, some boosters and rules change in Solo games.
- The rules of this event: tap the i on the PLAY button to see the mode and its special rules, and tap Learn more to read the official rules of that solo.
Each target you reach gives you its prize, but you keep your booster only if you reach the last target. You can try again as many times as you like, but prizes you’ve already collected can’t be won again, and a failed try can cost you the booster you played with.
In solos with a move limit, such as Perfect Heist and Score Rally, each game gives you 25 minutes, and a game usually takes only 5 to 10, so there’s no need to rush. Use the extra time to scan the whole board before each move.
Not every solo works the same way. In Cosmic Rush, you have unlimited moves but only a short time, and 4-piece matches add time. In Speed Solo, the clock runs faster, so plan your next move while animations play. In Mutation Lab, pick the mutation that works best with your booster and the board.
In Score Rally, points above the next checkpoint don’t count until you reach it, so a huge combo right before a checkpoint can be partly wasted. Each checkpoint refreshes your moves, and moves you have left at the end of a lap go to your booster bar. Our game modes guide explains how solo events work.
Your Opponent’s Timer Seems Slower
It can look that way, but both players get the same time per turn. In most matches, the timer stops during animations and booster activations, so a turn full of extra moves and booster activations simply looks longer.
Showdown, Match Rumble and Party are different: there, the timer keeps running during animations. That can be confusing when you switch between modes, and in those modes a booster with a long animation also uses more of your time.
Sometimes your opponent seems to keep playing after their timer hits zero. Your opponent may have made those moves in time, but the moves can reach your screen a little later. This kind of lag can make it look as if they get more time than you. According to the Match Masters help center, this is only a display issue: the timer is tracked correctly, and your opponent gets no extra time.
Disconnects Cost You Boosters
Losing a booster to a dropped connection hurts more than losing a match on the board. If your connection drops, you have 30 seconds to reconnect. After that, it counts as a technical loss for you, and your opponent gets a technical win. Leaving with the white flag is different: it counts as giving up, not a technical loss.
When your opponent has connection problems or leaves the game for a moment, you’ll see a connection warning with a countdown on your screen. If they come back in time, the match continues where it stopped.
In some cases, the game gives your booster and perks back after a disconnect and shows a compensation message. This doesn’t happen every time, especially when disconnects keep repeating. If something is missing, restart the game first, then contact support with as many details as you can.
Disconnects usually come from the connection or the device, so a few habits help:
- Play on a stable connection: if your Wi-Fi is weak, switch to mobile data, or the other way around.
- Close background apps: apps running in the background can slow the game down.
- Stay in the game: switching to other apps during a match can cause freezes and crashes.
- Keep the game updated: install new versions when they come out.
Keep Losing in Match Masters: FAQ
Why do I keep losing in Match Masters?
Usually it’s a mix of luck and things you can control. The starting board and the new pieces are random, but the order of your moves, the board you leave your opponent and your booster and perk choices all affect how often you win and how much a loss costs you.
Can you win every match in Match Masters?
No. The starting board and the new pieces are random, so even experienced players with strong boosters lose. You can win more often, though: don’t miss a ready 4- or 5-piece match, use your extra moves before your booster, and clear red pieces from the board when your opponent’s booster is almost full.
Why does my opponent get so many extra moves?
Partly luck and partly the booster: new pieces drop in at random and can set up the next 4- or 5-piece match, and strong boosters create more of these chances. These chances don’t come often, so when a 4- or 5-piece match or two special pieces next to each other are ready on your turn, use them yourself before your opponent can.
Is it better to go first or second in Match Masters?
Neither is a sure advantage. Going first helps when the starting board is good and has a ready combo. Going second lets you see what your opponent did before you move, and their matches can leave you a better board. In Gem Grab, you may also get the higher-value crystals that drop in after they clear the first ones.
Should I use my booster before or after extra moves?
In most modes, after. A booster clears pieces from the board, so using it first can destroy a 4- or 5-piece match that would have given you an extra move. Use your extra moves first, then activate the booster.
Why do I keep getting matched against stronger boosters?
Match Masters says its matchmaking takes several factors into account, so you can sometimes face a higher-tier booster. A weaker booster doesn’t guarantee a loss. If you want to play against the same tier, Booster Clash only pairs boosters of the same tier.
Is Match Masters pay to win?
Buying items can give some advantages. For example, the Premium Pass lets you swap a random booster or sticker reward without watching an ad. But Match Masters says buying items doesn’t guarantee a win. Legendary and SE boosters cost more coins than other boosters, but you can also get them for free from trophy rewards, events, daily gifts, sticker albums and the Duplicates Bar.
Does Match Masters use bots?
Match Masters says you’re mainly matched against real players. In a limited number of cases, when there aren’t enough real players to start a match quickly, the game may pair you with a computer-controlled opponent to reduce waiting time.
Why does my opponent’s timer look slower?
Both players get the same time per turn. The timer stops during animations and booster activations, so a turn with many extra moves looks longer. If your opponent seems to move after their time runs out, it’s a display issue, not extra time.
Do I lose my booster if I disconnect?
It can happen. After 30 seconds without a connection, it counts as a technical loss for you, and your opponent gets a technical win. In some cases, the game gives your booster and perks back with a compensation message. If it doesn’t, restart the game and contact support with the details.
What should I do when my opponent’s booster is almost full?
Match red pieces to take them off the board. In a normal match, the red pieces you match don’t charge your opponent’s booster. Red Alert is the exception: there, matching red charges their booster, so avoid red matches.